Change Gutter Profile Revit

Revit Families Series Custom Gutter Profile A How To Guide Youtube

Revit Families Series Custom Gutter Profile How To Revit Products Autodesk Knowledge Network

Tekla Structural Designer To Revit Integration Civil Engineering Community Tekla Tekla Structural Designer Has Th Design Civil Engineering Software Design

Gutter End Caps In Revit Architecture Youtube

How To Model A Gutter On A Sloping Roof Edge Revit

Work With Gutters Revit Products 2016 Autodesk Knowledge Network

Enjoy the videos and music you love upload original content and share it all with friends family and the world on youtube.
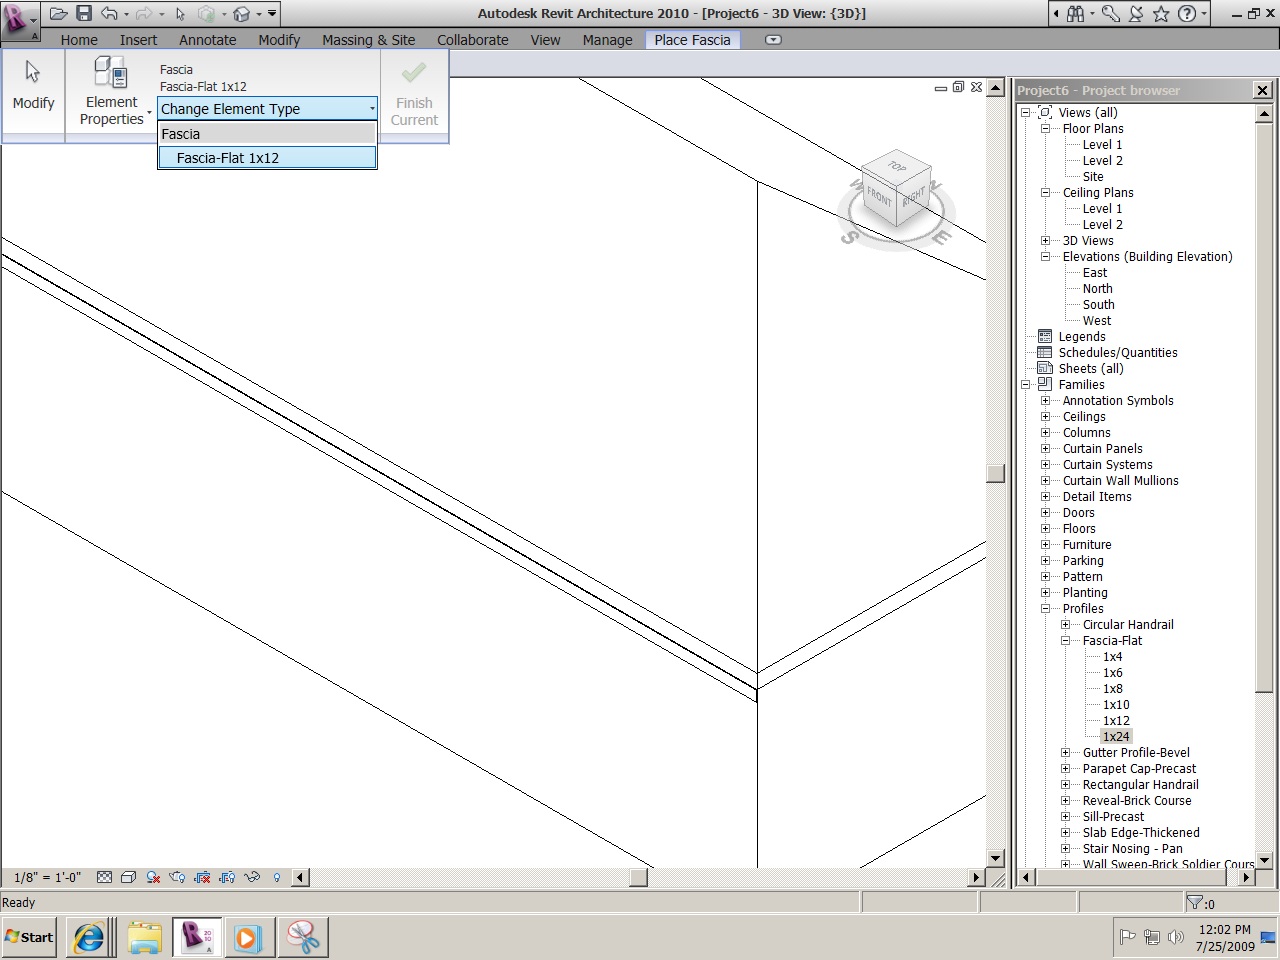
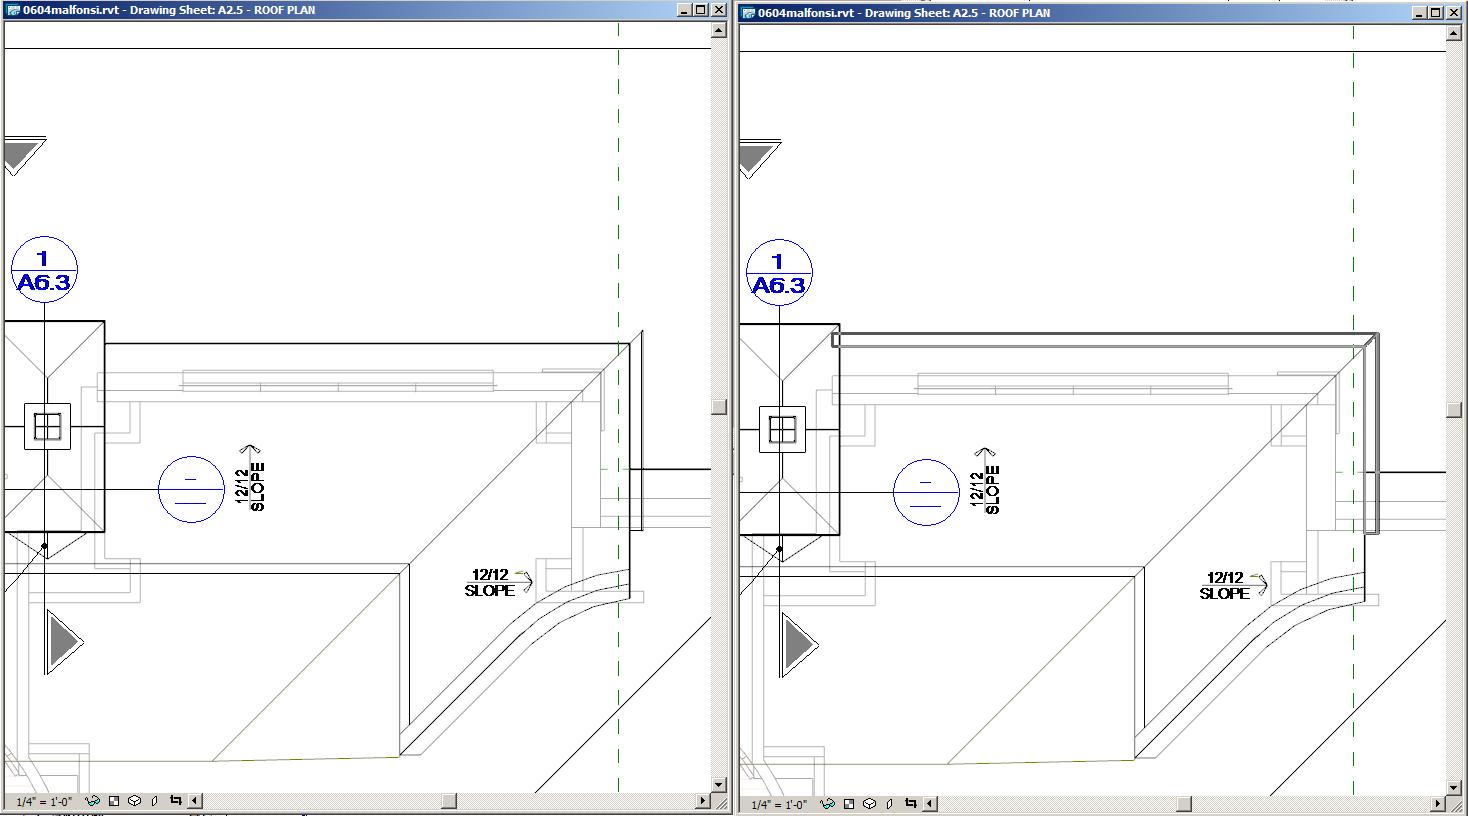
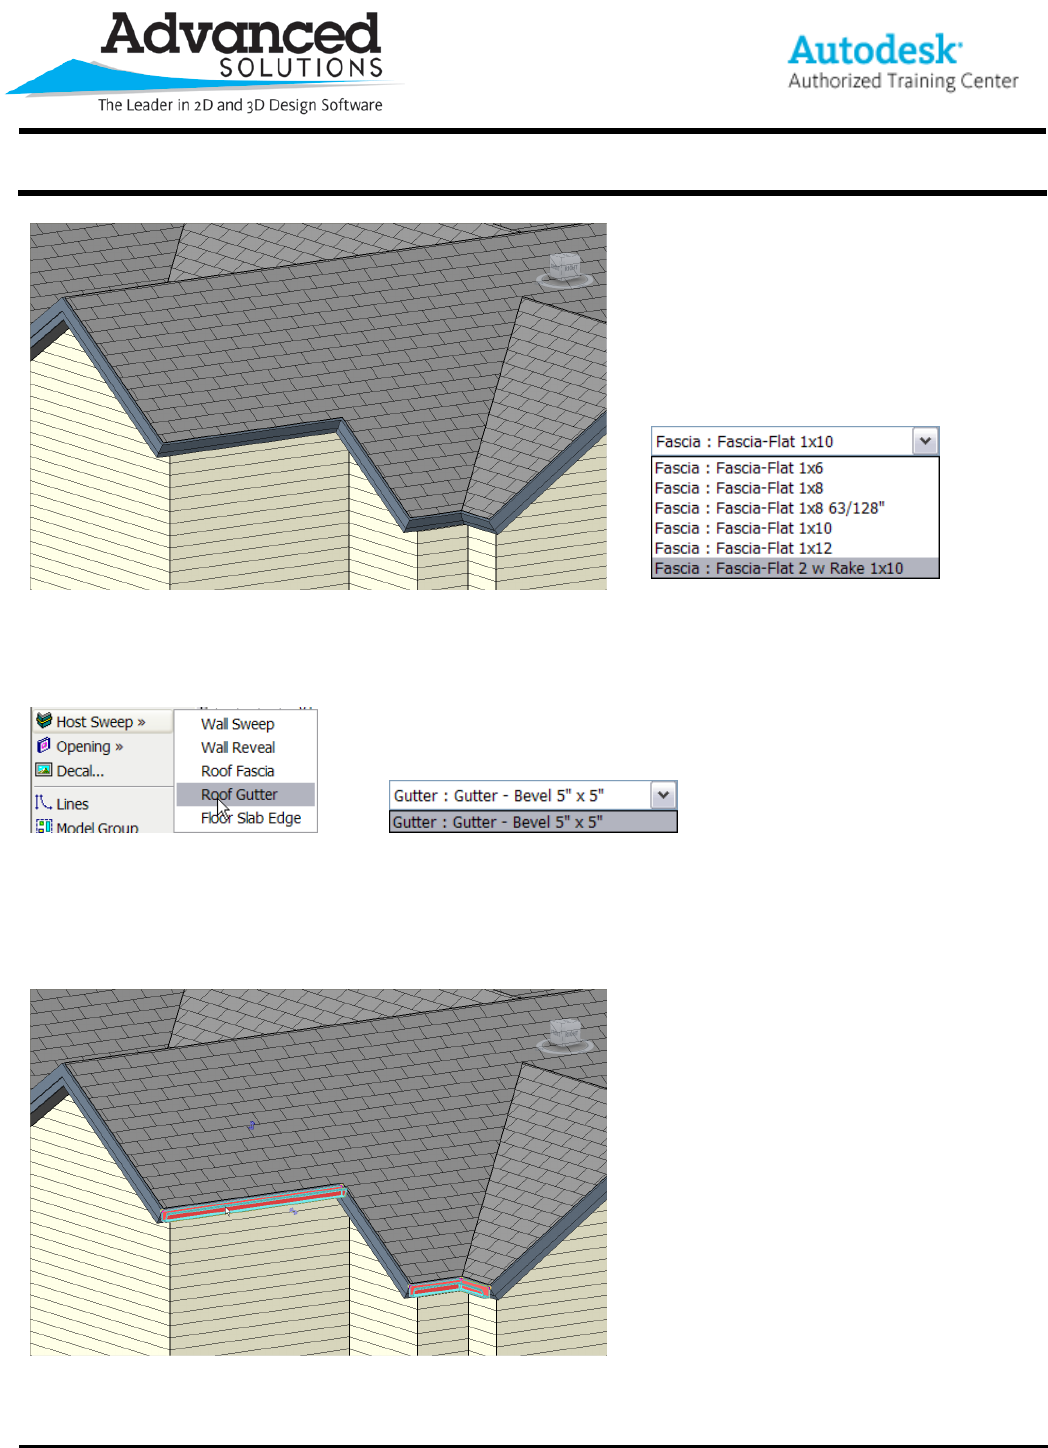
Change gutter profile revit. You can select either the inside or outside edge of the top of the fascia that is present. Changes to type properties apply to all instances in the project. The profile shape for the fascia or gutter. Only the chain of edges can be selected for the roof.
Finally you will need to reposition your downpipe in the 3d view or a perpendicular elevation. To change type properties select an element and click modify tab properties panel type properties. As you click edges revit treats this as one continuous gutter. Subscribe to the repro products channel.
In the project browser find families then find profiles. Get these project files and all advanced 1h courses. You can also select the lower outside edge of the fascia. Visit revit products forums.
Click modify place gutter tab placement panel restart gutter to finish the current gutter and start a different gutter. You need to modify existing or create a new profile family. Join us for videos prov. How to create a custom gutter profile in revit 2017 one of a series of how to videos on family creation.
Https youtu be noznjnfia2u walls in revit. Go to the modify tab select the join command and join the gutter end cap to the the gutter. You will find you gutter profile there. When you press tab revit cycles through available selections and then highlights the chain of edges.
Get answers fast from autodesk support staff and product experts in the forums. Edit the family to suit your needs. Choose from a list of predefined profiles or create your own profile using the profile hosted rft template. To finish placing gutters click on white space in the view.

Settlers Gutter Profile Cmiwa Gutter Profiles Gutter Gutters

Gutters With Slope Autodesk Community

Slab Edge Profile Autodesk Community Revit Products

Comline Gutter Profile Cmiwa Gutter Profiles Gutter Gutters

The Town Hall Of Harelbeke Architecture Details Modern Architecture Roof Detail

Solved Downspouts Autodesk Community Revit Products

Solved Where Are Roof Gutters In Familys Autodesk Community Revit Products

Go And Visit Our Web Site For Far More Involving This Unbelievable Gutters Garden Guttersgarden En 2020 Detalles Constructivos Arquitectura Fachadas
Revitcity Com Fascia

Customize Roof Gutter Youtube

Revit Family Profile Youtube

Solved Make Top Rail Editable Autodesk Community Revit Products

Half Round Gutters Profile Google Search Gutter Profiles Gutters Profile

Kalzip Construction Details Archiexpo Roof Detail Roof Construction Architecture Details

Rooftop Gutter And Etfe Clamping Assembly Source Http Fabricarchitecturemag Com Articles 0508 Dt Roofto Architecture Details Architecture Detailed Drawings

Http Www Youtube Com Watch V Jjajo34pmns Architecture Revit Tutorial Foundation
Https D1ozhi4p59900 Cloudfront Net Files Urn Adsk Content Library 78756fcf E6f3 4184 Abdd 04afc0337a02 48c8539a 1922 47cf 9cba 34fc1756aef9 Handout21124ar21124luebkerdeckingaau2016handout Pdf Expires 1609459199 Signature Ewy9wku22oeb839awhbtbp4pwbhlsqe3rksvjobyutarmfsmdo6uzdflqwzw2etaerju26botmu3 Qoe2t4f3tpgdnggbqvzfpmr0il42brp3chygaywsd7d6pmfha9y291ad1y54mscw95venb2ktr Vint5e7dug29hgu Ccggboecoanepivltxa0sb7mxkq3vgyg366lgkodxfulrnv G2yktdc15mx 6hrcyzfnfnayuptht5rwopqxluldpg1 Kzp Bshmhq0jps9tlpwe3v3j4kutyk9dyjx7jvwzimf5ztdt3buy6frfka89o8f6ro6nsvdkkmk7j M6dw Key Pair Id Apkaia22nyyfu6jzr5za

Cut Profile Youtube
Https Encrypted Tbn0 Gstatic Com Images Q Tbn 3aand9gcqklcp0dl9tekat3uu4hzfughofwlyqngbfwlua4hecnmix7mid Usqp Cau
Video Add A Wall Sweep Revit Products 2020 Autodesk Knowledge Network

Instagram Photo By گروه فناوری سازه پلاس Oct 4 2015 At 7 10pm Utc Pre Engineered Metal Buildings Metal Building Designs Metal Buildings

Adding Gutters To A Roof

Bsi 050 Parapets Where Roofs Meet Walls Parapet Roof Detail Roof Design
Revitcity Com Gutter Display On Roof Plan
Back To Basics With Revit Walls Part 1 Vertically Complex Wall Types Synergis

10 Things You Should Know About Roofing Build Blog Modern Roof Design Building A Deck Roofing

Create 8020 Bim

Structural Design To Structural Fabrication Just Got Easier Design Fabric Structures

Aluminium Bull Nose Gutters Aluminium Bullnose Guttering Aluminium Elliptical Gutter Curved Guttering Quadrant Gutters Metal Bullnose Gutter

Solved Where Is Edit Profile In Revit Autodesk Community Revit Products

Eclipse Millennium Copper Gutter Accessories Gutters Copper Gutters Gutter

Rain Gutter Styles Guttering Profiles Types Rutland Gutter Supply

Pin On Diy And Crafts

Add A Gutter Revit Products 2018 Autodesk Knowledge Network
Adding Roof Fascias And Gutters 032709

Pin On Drafting Details

Joel S Roofing And Rain Gutter Co Inc Gutters Rain Gutters Rustic Pergola
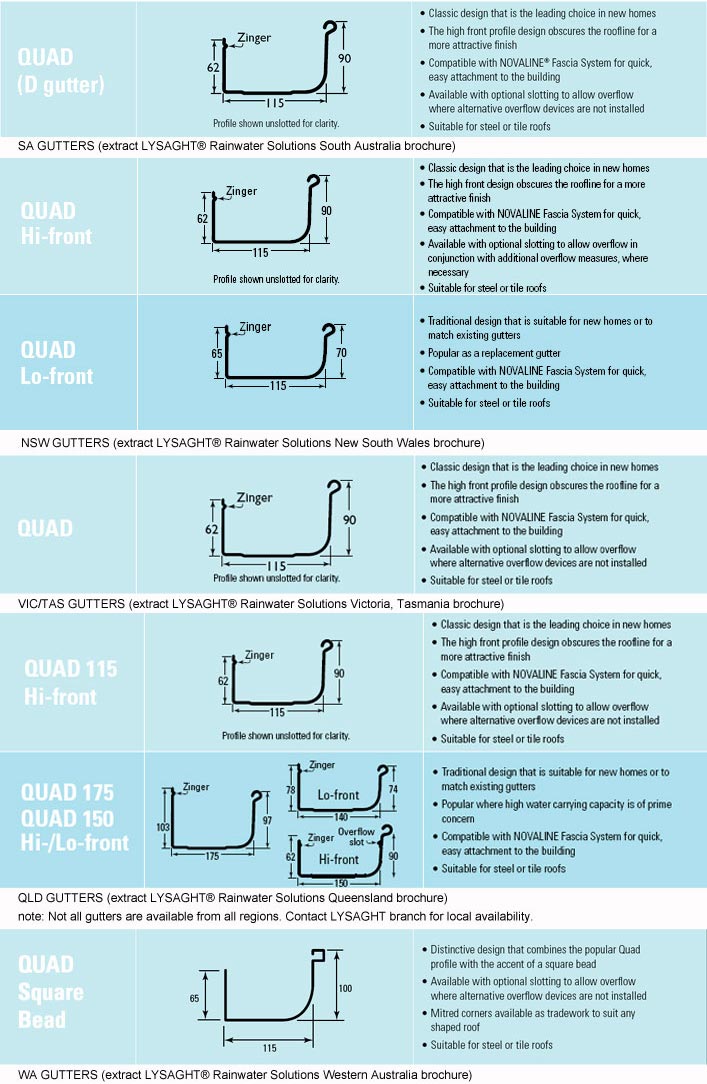
Lysaght Quad Gutter Steel Select

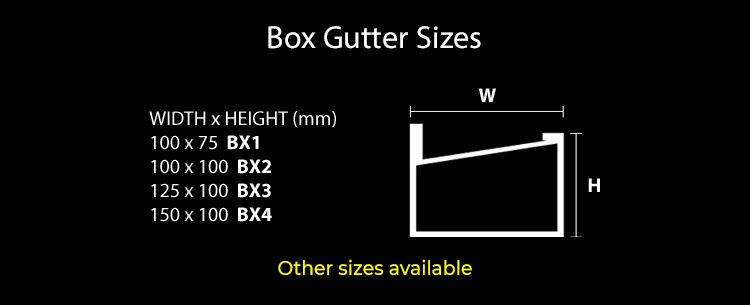
Pin By Daniel Simoneit On House Parts How To Install Gutters Gutter Sizes Gutter
Railing Appears Continuous And Intersects With Post In Revit Revit Products 2019 Autodesk Knowledge Network

Structural Steel Detailing In Tekla For Construction Projects In Australia Steel Detail Steel Structure Steel

Infinity Pool Construction Details Buscar Con Google Swimming Pool Plan Swimming Pool Steps Pool Construction